

How To Set Up A Piano Stand
DIY Digital Pianoforte Stand plus Bench (…a $25 projection!!)
DIY Digital Piano Stand plus Bench
Growing upwards, we always had a piano in our house. We all took turns taking lessons…..even though mine only lasted well-nigh 6 months because my instructor moved away (but I played other instruments, then it worked out). I recollect sitting down to the piano when I was bored and making up random melodies and singing dramatic lyrics forth with the nonsensical plunking of each key. I also remember trying to figure out sail music on my own (since my teacher moved away) and so having pretend recitals, where I would curtsy at the end and relish in my pretend applause. I mean, yous guys, I was an incredible pianist in my own piddling dream world….haha!! ;)
Anyhow — for the longest time, I have wanted to accept a piano for my kids to brainstorm plunking around on and possibly gaining an involvement in taking lessons. Only every fourth dimension I asked them, they always seemed very disinterested…..so I decided it wasn't worth forcing them to do, and that we would just expect. A few months agone, we started talking about playing musical instruments and I told them I played the trumpet from 4th-8th grade and sometimes I played the tuba, sousaphone, and was fifty-fifty the majorette in our little centre school ring. They thought that was so cool and started telling me all the instruments they wanted to play. I told them that all sounded great…..just if they wanted to play an instrument, they had to take piano beginning. Then, FINALLY——–they told me they wanted to requite pianoforte a try. :)
I started looking around online for a used upright piano but but didn't see annihilation that would piece of work. Plus, I wasn't sure I wanted to move a huge old pianoforte from someone else's house into ours. We'd take to rent a truck, rent a tuner, and then hopefully it would play well afterward all that effort. And so, instead, I started looking at full sized keyboards with weighted keys. That way, information technology would feel and by and large sound like a regular pianoforte and then transitioning to a piano wouldn't be and then awkward in the future. And—–headphones!!! Only the affair is……the only space in our business firm for a keyboard is out in the principal living room (which is also open up to the kitchen/dining room and where nosotros spend plenty of time), and I didn't want to only plunk information technology in the heart of my furniture as is. A standard upright piano is like a piece of pretty furniture, so when not in use, it's still pleasant to look at. Only a keyboard is a little different. Even though it's totally fine sitting out, I really wanted to create something that was more than like a pretty piece of article of furniture!
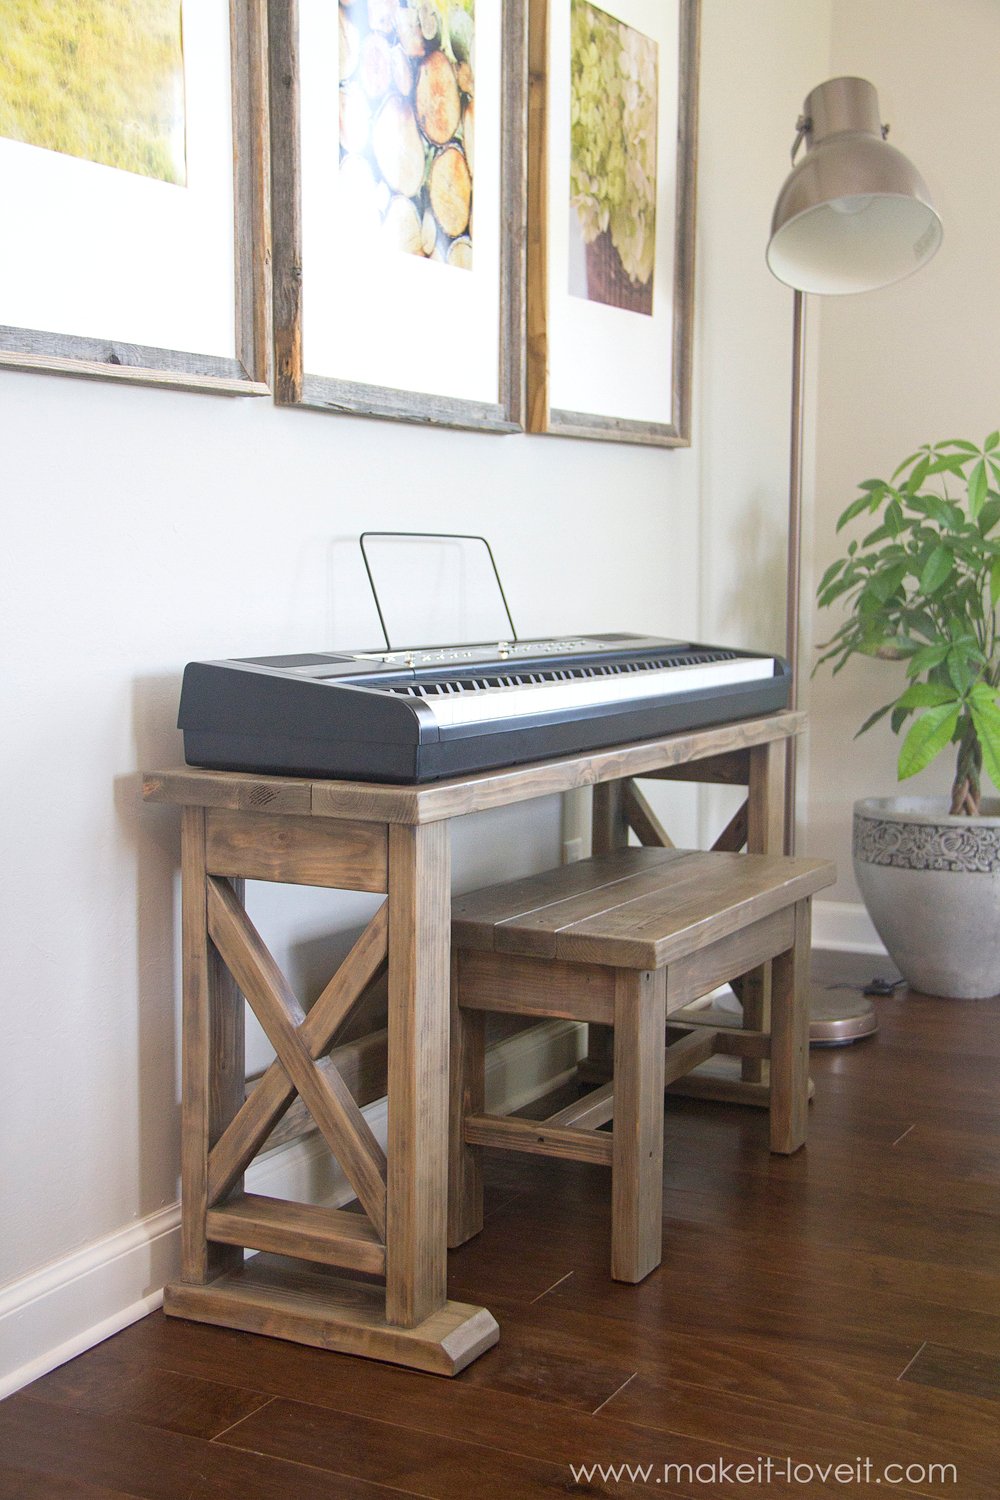
And then we created this all woods Digital Piano Stand…..complete with a niggling bench!

The stand is made from inexpensive pieces of pine and was put together in only a few hours. Information technology's a quick project that makes me very happy to see sitting in our front Living Room.

The design is more farm-style and was stained to look like old distressed woods. The top of the table and the bench both have planks of forest beyond the top….and I beloved how that turned out!

Oh, and that little bench was so fast to put together and could be used for so many things. And really, the stand could be heightened and used as a console tabular array or even a sofa table…….if you don't actually need a piano stand.

The stand puts the keyboard at a overnice piano tiptop that is perfect for adults to sit and play comfortably…..but also works great for budding little musicians who desire to acquire to play! (P.S. Elli and Connor both love taking lessons so far, and accept become obsessed with learning notes, finger placement, rhythm, etc! And I dearest that they can put headphones on and not but proceed the noise level down for the rest of us, they also assistance them to stay focused and non go distracted past what'south going on around them. And so every one time in a while, I have them unplug and let me mind for accurateness. LOVE those headphones! Oh, and THIS is the keyboard we have, which has weighted keys that feel more like a real pianoforte.)

Our stand and keyboard now sit along i wall, backside some chairs and it blends right in with what nosotros take going on in this front room…….and I love it!

And actually, for about $25 IN LUMBER, this Digital Piano Stand really didn't toll much to make! But just remember——yous could paint this all ane color, or make the stand up and demote two different colors. You could fifty-fifty use this in a bedroom every bit a homework desk-bound, a makeup station, or fifty-fifty a project table. So many reasons to love this little thing!
Want to make ane as well??
Offset OF ALL, we purchased our keyboard HERE, and honey it! Then the dimensions below accommodate our Digital Piano, that has an overall measurement of 51 3/4 inches broad, 13 inches deep, and 3 3/4 inches tall (to the top of the keys). If your keyboard is slightly unlike in size, make adjustments as needed.
ALSO, the dimensions for the pianoforte stand below put the top of the keys on our keyboard at thirty 1/2 inches tall. I looked up online what an upright acoustic piano acme was (to the top of the keys), and I got a variety of answers…..anywhere from 28-30 inches loftier. We went slightly higher as my married man and I are tall people (he's half-dozen'v″ and I'k 5'11"), so why not accept it at the taller end of the spectrum for once?!?! Our kids manifestly aren't full grown yet but nosotros didn't want to create something that was besides short for united states, and so if their teacher recommends it, maybe we'll sit them up on a book or 2 so that their arms are at a 90 caste angle and aren't reaching up.
Okay, let's get started. :)
SUPPLIES:
- 4 – two×4's $two.50
- iii – 2×6'due south $3.fifty
- 1 – 2×2'southward (If you tin't find 2×2's that are straight….rip some 2×4's down to size.)
- Screws
- forest glue (Hither'S the exact wood glue we used)
- Kreg Jig
- Counter Sink Bit
- Kreg Jig (HERE'S the EXACT 1 we accept….and Love!)
- Kreg Face Clamp (Here'S the Exact one nosotros accept…..that you lot Need while using the Kreg Jig)
- Drill
Finish & Misc:
- Stain (we used Minwax "Weathered Oak" and "Provincial"…both oil based)
- Polyurethane (we take had the best luck with THIS Full general Finishes, High Performance, H2o Based, Satin cease)
- Random Orbital Sander and Mouse Sander (You could go away with using merely a mouse sander…but it will take a bit longer. Hither'Southward the exact Random Orbital Sander that we take….and it'due south only $xxx.)
***The finished STAND measures approximately 26 iii/four inches alpine, 54 1/2 inches wide, and 15 inches deep.
***The finished BENCH measures approximately 18 i/4 inches tall, 30 inches wide, and 14 one/2 inches deep.
Okay, allow's start with the piano stand. To do and so, you will make the 2 end sections start and then connect them together with 2 long pieces…..information technology's a pretty bones construction.
Then, to make each end piece, you demand to cut 2 of your 2×4's into 2 longer pieces that are 23 ane/8 inches long and ii shorter pieces that are 10 inches long. Then you need ane 2×two piece that is 17 inches long and 2 2×two pieces that are viii 1/two inches long each. (I'one thousand just showing two 2×2 pieces in the epitome beneath, deplorable for the confusion….I just hadn't cut them down to size yet).

Then y'all need to to use your 2×4 pieces to create the main frame of this end section by laying the ii longer pieces on their side and the shorter slice at the top to lay flat and so the lesser shorter piece to lay on its side, only like shown below. The top horizontal piece is flush with the top of the side pieces, the lower horizontal slice is 2 one/8 inches from the bottom of the 2 side pieces.

But allow me support for a second… To connect these pieces together, the easiest style to connect them is to drill holes with a Kreg Jig (which is such an amazing tool and now that we have ane, we utilise it ALL THE TIME!! Information technology's a great investment, that actually doesn't toll much at all! You can find one at your local hardware store…..or yous can notice it Hither.) The Kreg Jig gives you lot a PERFECT angle and drilled hole for combing wood together in so many scenarios….and will save yous a whole lot of grief with getting things straight and secure. Go I!

This is what you want on your 2 shorter ii×4's……..on i side you lot desire the holes drilled in far apart (to provide room for attaching some screws later on on) and the other cease, the holes tin exist closer together.

At present, go alee and attach these pieces together (placing a thin layer of woods glue between), making sure that the 2×4'due south are all laying flush on a flat surface and that the drill holes are facing up on the upper piece…

….and that the drill holes on the lower piece or on the lesser side.

Drill your screws in place and then in one case you flip information technology over…..no holes will be seen!
Now, it's time to add the "X" to the inside of this rectangle slice, with your two×2's. Cutting one piece down to 17 inches and then the other 2 pieces downward to 8 1/2 inches. Reference the paradigm beneath for all the angles you'll demand to cutting the ends of each piece to create the "10".

Repeat the above steps to create another side piece that looks exactly the aforementioned, EXCEPT the summit drill holes in the horizontal ii×four mirror each other. (Call back, information technology'due south helpful to add a thin layer of wood glue betwixt all joining woods pieces.)

Now, cut 2 more two×iv pieces that are both 44 1/ii inches long. And so place the two end pieces on their sides and attach the two long pieces along the inner edges, adding holes with your Kreg Jig, just like above (reference the arrows below). The bottom 44 1/two inch long piece slice is attached 5 1/2 inches from the bottom edge of the side pieces.

Then from this view, the holes are subconscious.

At present, to create feet for the base of operations, cut 2 2×half-dozen's downward to sixteen inches long and four ane/two inches wide. Then, this is optional, merely nosotros decided to bending the top border, to make it await a little more polished.

To adhere the feet, turn the base of operations upside downwardly then add another piece of woods as a support and then clamp the whole thing together, with the foot hanging over about 2 1/two inches in the front and about 1/2 inch in the dorsum. Screw in place.

Next, I'm not sure how I didn't become a picture of screwing the table top pieces together……simply the top of the bench was created almost identically. In fact, if I didn't tell you that….you probably wouldn't have noticed. But the tabular array top consists of ii 2×half-dozen's (54 1/ii inches long each) and and so a 2×6 ripped down to 4 inches wide (that'south also 54 i/2 inches long)…..lined up together with the more narrow piece in the middle. Utilize the Kreg Jig to drill holes and adhere each of the pieces together…..creating one single tabular array top piece. The finished table peak is 15 ten 54 1/2 inches.

So, place the table top right on elevation of the base, hanging over about 1 i/ii inches on the sides and near 1 inch along the front end and back. Then secure information technology in place past installing several screws from the meridian in several locations.
Okay, now onto the bench, which tin be made for then many uses.
These are the wood pieces that you'll exist needing. Screw into place….using the Kreg Jig when needed.

And so create the seat of the demote, but like the tabular array height up in a higher place….but this time utilize a 2×4 downward the eye…..making the finished width 14 1/2 inches. And each piece needs to exist cut down to 30 inches long.

Then, eye the seat top onto the demote base of operations and middle it all the way around. Screw in identify from the top, right down into the base of operations.
Okay, now that it'due south all done…..it'south fourth dimension to either paint or stain your stand and bench. We chose to stain it with a combination of Minwax"Weathered Oak" and "Provincial" oil based stains…simply similar the Octagon Dining Room Table that nosotros fabricated a few months ago.
Once I got the color I wanted, I added 2 layers of this General Finishes, High Performance, Water Based, Satin finish……which works SO MUCH Amend than the Minwax brand!
And that's information technology!!!
Hope information technology works well for y'all too!
-Ashley
Source: https://makeit-loveit.com/diy-digital-piano-stand-plus-bench
0 Response to "How To Set Up A Piano Stand"
Post a Comment